
 diglloydTools™

|

|

|

$610 SAVE $110 = 15.0% ZEISS 32mm f/1.8 Touit Lens for FUJIFILM X OUT OF STOCK in Lenses: Mirrorless
|

|
2013 Mac Pro: How and Why to Partition the PCIe Flash Drive
Related: 2013 Mac Pro, hard drive, How-To, Mac Pro, Macs, Other World Computing, SSD, USB
Get Mac Pro at B&H Photo. See also MPG’s computer gear wishlist as well as diglloyd-recommended performance packages for Mac Pro.
See the general discussion of Choosing PCIe Flash Drive Capacity.
This discussion is about how to partition the internal PCIe SSD in the 2013 Mac Pro, though it applies to an iMac or any other Mac, and also to a hard drive system.
Reasons to partition
In general, MPG does NOT recommend partitioning a 256GB or 512GB SSD, because partitioning balkanizes capacity, and an SSD is expensive capacity.
Partitioning an SSD should be done only for clearly understood goals applicable to a particular user workflow.
Reasons to partition include:
- Separation of system and applications from user data. Since each partition (volume) has its own file system, damage or corruption or a “bad” system mean that the startup volume can be wiped clean if necessary, while not affecting data on other partitions (“my system software update screwed everything up”).
- A need to use more than one bootable system partition.
- Matching volume layout to another computer, or to an external backup volume-to-volume.
- In general, minimizing the risks that come from “everything in one bucket”: system, applications, user data, and so on.
There is no performance gain on an SSD by partitioning it.
How to boot and partition?
As shipped from Apple , it is not possible to boot from the internal SSD and partition it while booted off it.
Accordingly, a separate boot drive (hard drive or SSD, anything) must be used to boot the Mac, then partition the internal SSD. This can be done while retaining both the default Apple system software install and the recovery partition.
First, make a bootable clone off an existing Mac. Alternately set up the new Mac as is, then make a clone of the system volume, then boot off that clone and proceed.
Step #1 — boot externally, partition internal SSD
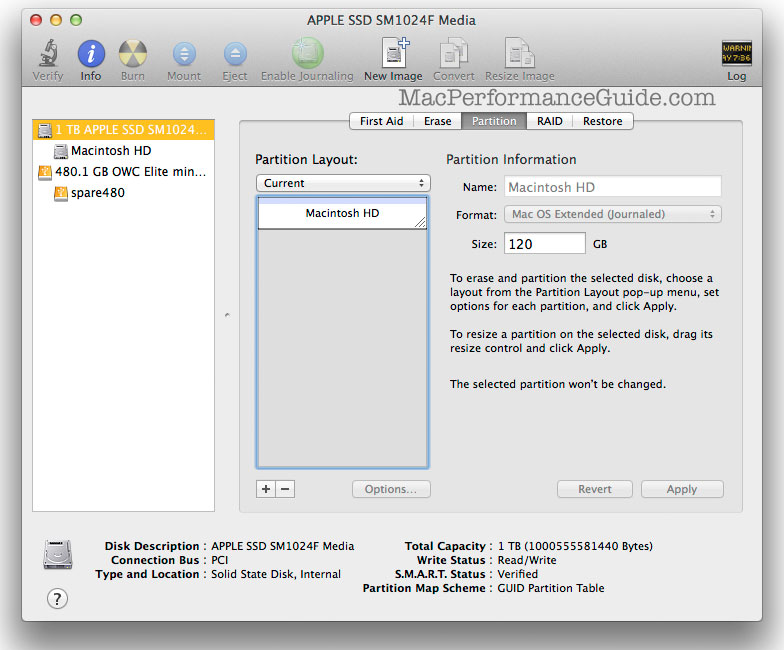
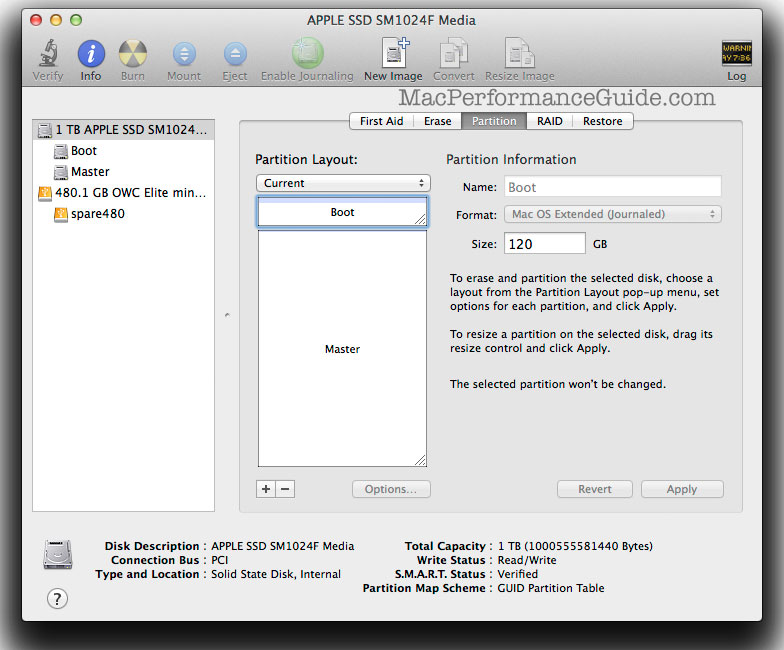
Boot off the external drive*, then open Apple Disk Utility. As shown below, the Mac has been booted from spare480. This allows the internal SSD partitioning scheme to be modified.
Go to the tab, and drag the partition handle up to shrink the boot partition to the desired capacity. A capacity of 120GB is generally ample for most users, the idea being that most user data will be located elsewhere.
After resizing, there is free space on the SSD which can now be used to create additional partitions (that gray area below Macintosh HD). Moreover, the Apple factory system install remains intact on Macintosh HD, as does the recovery partition (hidden by Disk Utility, so not seen here in this screen shot, but it’s there).
* Shortcut: pressing and holding the Option key at startup offers a choice of which volume to boot from.
Step #2 — add a 2nd partition
Here, the 2nd partition is named Master (“master copy”), meaning an original user data volume to be used for performance critical tasks.
Click the “+” icon (to the left of the button) to create a 2nd partition. Its size will default to the remaining capacity, ~880GB in this example. Then click .
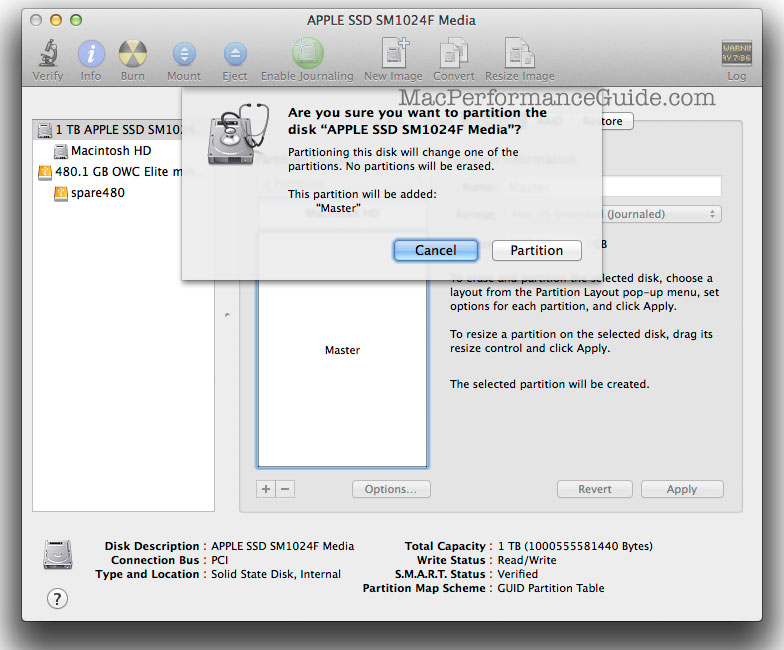
When done, the 1TB Apple SSD as shown has two partitions listed under it.
Here, the first partition has also been renamed Boot (previously Macintosh HD), resulting in Boot (120GB) and Master (880GB). The process is complete—reboot the Mac off volume Boot (set the startup volume).
Usage
In the Finder, a shows the two volumes Boot and Master created above.
Be sure to show volumes in Finder preferences, or Master will not be visible on the desktop (an Apple design idiocy that confuses many users as soon as they add a drive).
The OS X system and a variety of applications have been installed on 120GB volume Boot, showing ~71GB used. That capacity usage is more or less unchanging, because image files and other user data on go onto other volumes (drives). Therefore, the ~50GB of unused capacity is likely to go unused (wasted).
However, some extra space is important, a good rule of thumb being 20GB to 50GB of free space over and above anticipated usage. Needing more than that on the boot drive is generally an error in storage discipline.
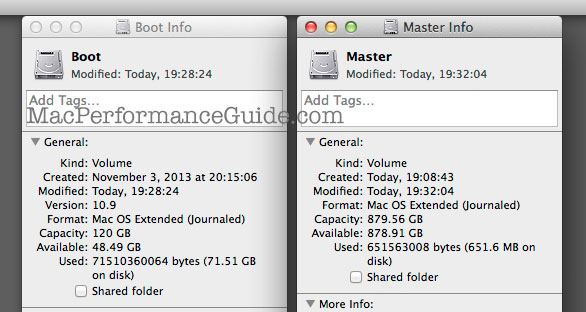
Also as shown, Master is an ~880GB volume. Use Master for high performance needs such Lightroom catalogs, large Photoshop files being actively worked on, caches and scratch space, and similar items that benefit from high performance (caches and scratch space are fine on Boot also; it’s just a matter of capacity).
- For users with both high capacity storage needs and high performance requirements, use a tiering/migration strategy to always work with current projects on Master, migrating them to additional storage devices when the job has been completed.
- Items like original image files or iTunes songs or video clips do not benefit from high SSD performance. So while they can be stored on Master, it is a waste of the high performance capacity. With ample capacity, there is no reason not to use it for such things, but when capacity is limited, store such things on an external hard drive or similar (many choices there, use USB3 or Thunderbolt).
By maintaining a storage discipline up front, a future reorganization headache is avoided. So unless storage capacity needs are believed unlikely to approach the SSD capacity, it is wise to start by storing non performance-critical data on other (external) drives. Good choices include a USB3 hard drive or dual drive unit or quad-drive unit.
