 diglloydTools™


How to Create an Encrypted Volume on an SSD or Camera Card
Related: APFS, backup, camera cards, CFExpress camera storage card, Disk Utility, encryption, How-To, Other World Computing, OWC Atlas camera storage cards, SDXC camera storage card, security, SSD
re: Camera Cards for Wallet Backups
I’m a fan of wallet backups when I travel, just in case something burns up my house and/or my travel van is looted. Since I always carry my wallet, a backup that can fit into my wallet is super convenient and safely away from any losses elsewhere.
However, carrying sensitive data in one’s wallet is not a smart move without encryption, in case the wallet itself is stolen.
Here’s how to turn any SSD or camera card into an APFS encrypted volume. Windows might have a similar facility (not sure). Tips:
- This approach works on any kind of drive including hard drive, SSD, camera card.
- CFExpress Type B camera cards can run at full speed with encryption, depending on card reader. Macs do not have built-in readers for this type of card, so you’ll need to get one.
- SDXC camera cards work, but are extremely slow for writing (around 34MB/sec). If the size is small, this isn’t really an issue, especially when doing incremental backup/clone. Read speed is largely unaffected.
- Encrypted volumes run at full speed or reduced speed, depending on the type of card and card reader.
If you want an encrypted SSD (not a camera card), some brands like Samsung offer hardware encryption eg Samsung T7, but you will have to install special software on every computer that uses it. That software is increasingly problematic as Apple continues to “harden” macOS security. Thus this approach is a workaround for Mac users that may be more appealing.
Recommended camera cards and readers: and Good choices: OWC Atlas FXR, OWC Atlas Dual CFexpress + SD Card Card Reader, OWC Atlas Pro, OWC Atlas Ultra
Creating an encrypted volume in Disk Utility
This is not technically as secure as encrypting your Mac’s internal SSD on Macs with T2 security chips (the “secure enclave” container for the encryption keys), but those Macs cannot do any better for external volumes anyway, and our topic here is precisely that: encrypted external backup volumes.
These instructions will erase (wipe-out) the contents of the card that you format. Alternately, choose Partition to add an encrypted APFS partition on a volume that is already APFS.
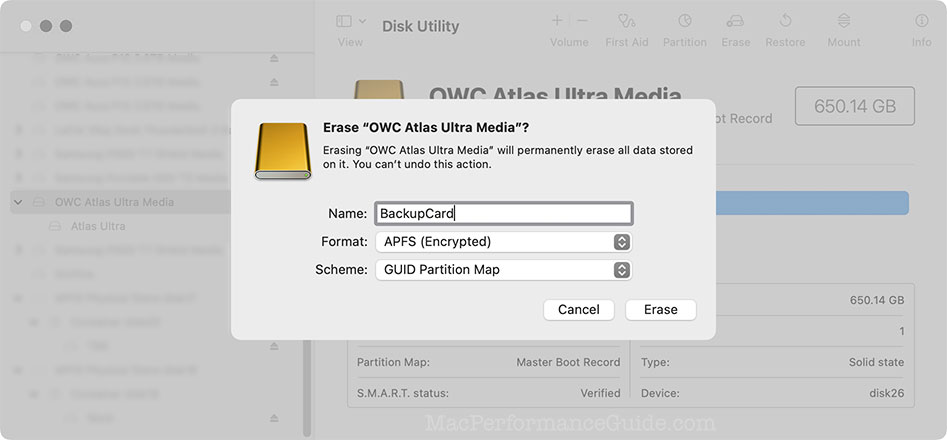
1. Open Disk Utility in /Applications/Utilities.
2. Choose
3. Locate your camera card volume in the left at left (here, OWC Ultra), but select the entry containing it (here, OWC Atlas Ultra Media).
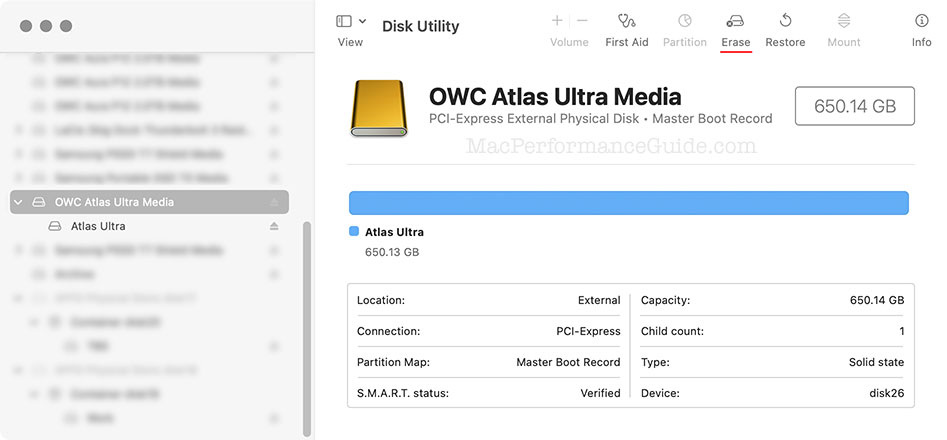
4. Click at the top of the window.
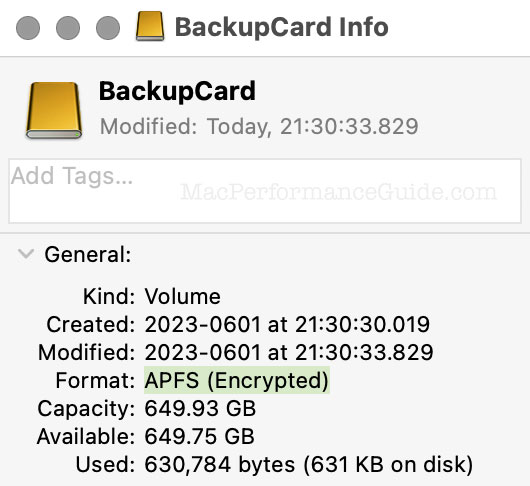
5. Choose with and choose a name for the volume eg in this example.
You will be prompted for a password. This is NOT your computer password. It is a password used to encrypt the card. Use a password/passphrase of at least 12 characters and with mixed stuff (letter, numbers, punctuation, etc), and use a different password from that of your computer.
Done
That it! You are good to go. When the card or SSD is attached, your Mac will ask you for the password needed to decrypt it.
Note also that when using APFS, it is possible to add another APFS volume on the same card or SSD, and that additional volumes can be encrypted or not; the decision is for each volume.